|
|
||
|---|---|---|
| case_5v_PCB | ||
| docs | ||
| firmware | ||
| kicad | ||
| Keypad.py | ||
| LICENSE | ||
| Logger.py | ||
| NTP.py | ||
| Networking.py | ||
| Oled.py | ||
| README.md | ||
| TimeUtils.py | ||
| configs.py | ||
| main.py | ||
| secrets.py | ||
README.md
TCS2FHEM !!!WORK IN PROGRESS!!!
If you have a TCS door intercom system and want to integrate it into your FHEM instance, this is a project for you. The goal of this project is to have a device, that connects the TCS intercom to FHEM. It should allow to trigger the dooropener and other functions (such as switching on the light) in FHEM. Also it should send events (like someone ringed the bell at the front door, or someone ringed the bell at the main door) to FHEM, so you can automate it (send notifications, interact...)
Hardware
- Raspberry Pico W
- Waveshare 2,23" OLED Display
- 4-Button Keypad
- PCB for your need (see kicad folder for examples)
- 3D-printed Custom Case for Pico and Button Keypad and power circuit (see case_5v_PCB folder as an example)
Prereqisites
You need your PCB fully soldered with everything (you can use a Breadboard temporarily), including keypad and display. Load the Micropython firmware onto your Pico W. I used the v1.19.1-782-g699477d12 (2022-12-20).uf2. It is highly recommended to load the newest firmware from the official repository: https://micropython.org/download/rp2-pico-w/ - But you can use the one I used too, see firmware folder in this repository. Then upload all *.py files to the Pico W's root path (follow the instructions for configuration) and connect the TCS Bus lines accordingly. Finally plug in power (if not powered by TCS bus).
Instructions/Setup
In the file configs.py set your configurations:
country: your countrycode (AT=Austria, DE=Germany...) (2-digit string)
ntp_host: set a ntp server (string url)
gmt_offset: offset to gmt for your timezone in hours (int)
auto_summertime: Enables changing to summertime (and back) automatically (True/False)
disable_wifi_powersavingmode: Wifi powersavingmode is enabled per default. Set to true to disable powersavingmode for Wifi (True/False)
api_port: Port on which the API is available (int)
displayoff: Minutes after last action, display goes off automatically (int)
log_incoming_bus_messages: Logs the hex value of every incoming bus message, which is useful to find out relevant messages (bool)
log_housekeeping_days: Logfiles older than this value in days get deleted by housekeeping (int)
frontdoor_ringing_message: The TCS Bus message if someone rings the front door (hex)
door_ringing_message: The TCS Bus message if someone rings the door (hex)
door_trigger_message: The TCS Bus message to trigger the front door opener (hex)
light_trigger_message: The TCS Bus message to trigger the light (hex)
In the file secrets.py set your configurations:
ssid: Wifi name (string)
pw: Wifi password (string)
api: API key (string)
Hint: use openssl rand -hex 20 to generate the api_key
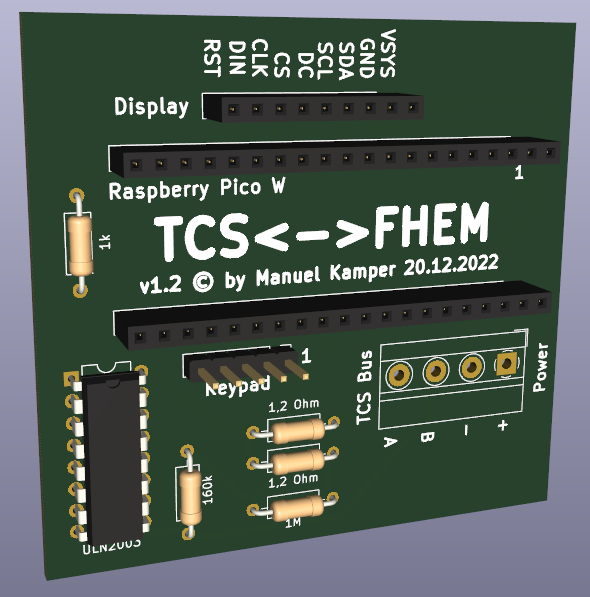
Wiring of Display
OLED   =>    Pico
VCC    ->    VSYS
GND    ->    GND
DIN    ->    11
CLK    ->    10
CS     ->    9
DC     ->    8
RST    ->    12
SDA    ->    6
SCL    ->    7
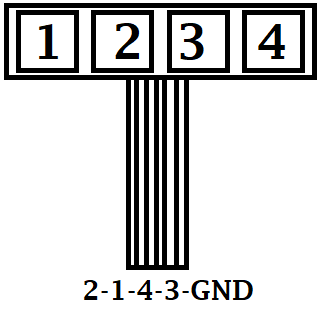
Wiring of 4-Button Keypad
Power circuit
Power from TCS Bus
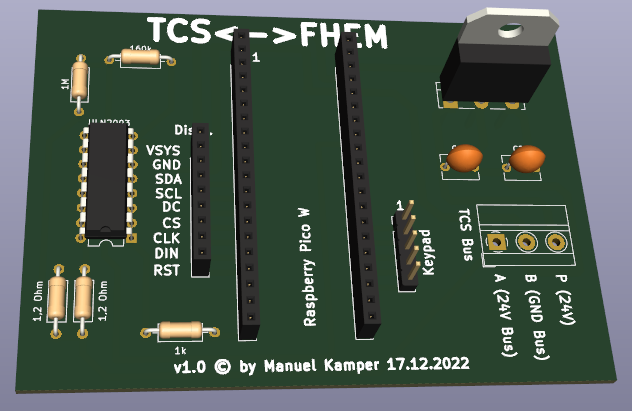
The power circuit allows you to run the Pico W directly from the TCS bus system's power. It also connects the bus to the Pico to read and write from it. The circuit files for KiCad are stored in the kicad subfolder 'power_from_tcs_bus' of this repo. You can order/print your own PCB with that files.
Power from 5V power source
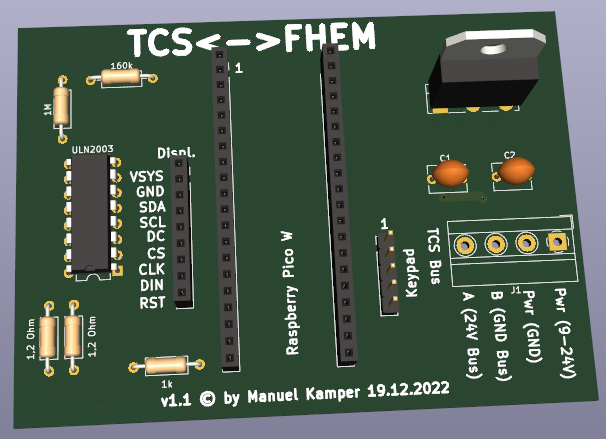
The power circuit allows you to run the Pico W with a separate 5 Volt power source (f.e. a USB power adapter). It also connects the bus to the Pico to read and write from it. The circuit files for KiCad are stored in the kicad subfolder 'power_via_5v_source' of this repo. You can order/print your own PCB with that files.
Power from 9-24V power source
The power circuit allows you to run the Pico W with a separate power source from 9 Volt to 24 Volt. It also connects the bus to the Pico to read and write from it. The circuit files for KiCad are stored in the kicad subfolder 'power_via_9-24v_source' of this repo. You can order/print your own PCB with that files.
Networking
Be sure that you give your Pico a static IP address on your router, so you know where the webservice is available and can set it up in FHEM.
TCS2FHEM API
You can configure the port, on which the API runs in configs.py in the 'api_port'-value. You also have to set an API-Key in secrets.py in the 'api'-value. Then you can call the API as follows:
http://servername/api_key/command[/json]
You can use the following commands:
triggerdoor - Triggers the front door opener
triggerlight - Triggers the light
togglepartymode - Enables/disables the Party-Mode
partymodeon - Sets Party-Mode enabled
partymodeoff - Sets Party-Mode disabled
partymodestate - Returns the state of the Party-Mode
ping - Check if the API is up and running
stats - Returns some stats of the device
reboot - Reboots the device
FHEM API
todo