Sidebar
Handle
You can customize &brandShortName; to better suit your needs using features like Sidebar, bookmarks, and Tabbed Browsing.
This section describes the customizable aspects of &brandShortName;'s browser component, Navigator.
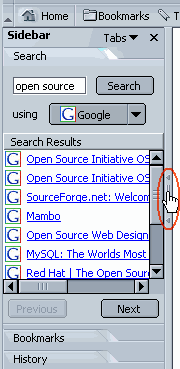
Sidebar is a customizable area in your browser where you can keep items that you need to use all the time—the latest news and weather, your address book, stock quotes, a calendar—and many other available options. Sidebar presents these items to you in tabs that are continually updated.
&brandShortName; comes with some Sidebar tabs already set up, but you can customize Sidebar by adding, removing, and rearranging tabs.
[Return to beginning of section]
To open Sidebar, press F9 or open the View menu in Navigator, choose Show/Hide, and then Sidebar from the submenu.
Once Sidebar is opened, you can use its handle to close, open and resize
Sidebar's frame. Move the mouse pointer up and down along the left edge
of the &brandShortName; window. The pointer changes to a hand when it touches
the handle
for Sidebar, as shown in the picture.
|
Sidebar |
To close Sidebar with its handle, do one of the following:
[Return to beginning of section]
To view a tab:
Search. The Search tab opens, which allows you to search for web pages.
Tip: To reload a Sidebar tab, right-click on the tab title and choose Reload from the pop-up menu.
[Return to beginning of section]
To add a new tab:
Tabsat the top of Sidebar, and select Customize Sidebar from the menu
Note: If you add more than eight tabs to Sidebar, &brandShortName; hides the remaining tabs to reduce clutter. To scroll through the hidden tabs, click the down arrow button at the bottom of Sidebar until you see the desired tab. Click the up arrow button to once again scroll up.
Tips:
Tabsat the top of Sidebar, and select Sidebar Directory.
You can also turn Sidebar tabs on and off.
Tabsat the top of Sidebar. Current tabs are listed in the lower part of the menu.
Tip: To quickly turn off a Sidebar tab, right-click on its name and choose Hide Tab.
[Return to beginning of section]
Note: Not all tabs can be customized.
Tabsat the top of Sidebar and select Customize Sidebar from the menu.
The instructions vary depending on the source of the tab—in addition to &brandShortName;, tab providers can be any company, organization, or individual who uses the Internet.
[Return to beginning of section]
Tabsat the top of Sidebar and select Customize Sidebar from the menu.
[Return to beginning of section]
Tabsat the top of Sidebar and select Customize Sidebar from the menu.
[Return to beginning of section]
Tabbed Browsing lets you open more than one web page in a single window. Each web page has its own tab across the top of a single Navigator window. Each tab appears on the Tab Bar. For example, you can visit mozilla.org, icq.com, and cnn.com within one window instead of three windows.
| Click this to open a new tab. | |

|
|
| Tab being viewed. | Click this to close the tab being viewed. |
| Tab Bar | |
You don't need to have several windows open to visit several web pages; thus, freeing up more space on your desktop. Instead, you can open, close, and reload web pages conveniently in one place without having to switch to another window.
[Return to beginning of section]
There are several ways to customize Tabbed Browsing. For example, you can change your preferences to open new Navigator tabs from the Location Bar. You can set up Tabbed Browsing in other ways too, such as loading new Navigator tabs in the background so the first page is kept on top while the second page is loading. To learn more about setting up Tabbed Browsing in &brandShortName;, see Navigator Preferences - Tabbed Browsing.
[Return to beginning of section]
You can open a Navigator tab in the following ways:
Opening a New Blank Navigator Tab:
new tabicon
Opening a Web Page Link in a Navigator Tab:
Note: You must set your Tabbed Browsing preferences to open a Navigator tab from the Location Bar. See Navigator Preferences - Tabbed Browsing for more information.
Tips:
[Return to beginning of section]
Tabs are displayed in the order you open them, which may not always be what you want. To move a tab to a different location within a &brandShortName; window, simply drag it there using your mouse. While you are dragging the tab, &brandShortName; displays an indicator to show where the tab will be moved. Alternately, you can use keyboard shortcuts to move tabs within a window if desired.
Note: The keyboard shortcuts don't work when a text box has focus.
[Return to beginning of section]
A bookmarked group of tabs is called a Groupmark. To bookmark the group of Navigator tabs in the current window:
Bookmark This Group of Tabs.
Tip: To learn how to use a group of tabs as your home page, see Navigator Preferences - Navigator.
[Return to beginning of section]
You can close Navigator tabs in several ways:
Closing the Navigator Tab Being Viewed:
Xbutton on the right side of the Tab Bar.
| Click this to open a new tab. | |
|
|
|
| Tab being viewed. | Click this to close the tab being viewed. |
| Tab Bar | |
Tips:
[Return to beginning of section]
Normally, web pages are displayed in the default font set by your browser or in a font chosen by the web pages' authors.
To change the default fonts:
Western.
Many web page authors choose their own fonts and font sizes. To allow fonts
other than the ones specified in your preferences, check Allow
documents to use other fonts
.
[Return to beginning of section]
Normally, the background and text colors on web pages are determined by the default colors set by your browser or by the pages' authors.
To change the default colors:
Most web page authors choose their own colors. You can override the
authors' intentions by selecting Use my chosen colors, ignoring
the colors specified
.
When viewing the source of a web page, you can see the HTML syntax of the
source of a web page highlighted in specific colors by selecting Enable
syntax highlighting
.
[Return to beginning of section]
You can change the look and feel of &brandShortName; by changing themes.
Note: You need to quit and restart &brandShortName; after you apply a new theme in order for the change to take effect.
Shortcut: You can also change themes by opening the View menu, choosing Apply Theme, and then choosing the theme you want to use.
[Return to beginning of section]
The Navigation Toolbar, pictured here, helps you move around the Web.
|
|||
| Back | Forward | Reload | Stop |
[Return to beginning of section]
The Personal Toolbar is completely customizable—you decide what you want to keep there.
 |
| Personal Toolbar |
You can easily add, delete, and rearrange items in the Personal Toolbar.
Select the buttons you want to see in the toolbars, choose the buttons that you want on your toolbar.
You can add buttons for your favorite bookmarks, or folders containing groups of bookmarks. To create a new bookmark to add to the Personal Toolbar:
 (located to the left of URL in the
Location Bar) to a desired place on the Personal Toolbar. You can drag the
icon directly to the Personal Toolbar, or to a folder on the Personal
Toolbar. For more information, see
Adding Bookmark
Folders to the Personal Toolbar.
(located to the left of URL in the
Location Bar) to a desired place on the Personal Toolbar. You can drag the
icon directly to the Personal Toolbar, or to a folder on the Personal
Toolbar. For more information, see
Adding Bookmark
Folders to the Personal Toolbar.Note: The bookmark icon
may appear as another page-specific icon if you have
checked Show Website Icons in preferences. See
Appearance Preferences -
Appearance for more information on changing this preferences.
Each item in the Personal Toolbar folder appears as a toolbar button. You may need to enlarge the browser window to see them all.
Adding Bookmark Folders to the Personal Toolbar
You can add bookmark folders to the Personal Toolbar to sort your favorite bookmarks into categories. For example, you can have one folder on the Personal Toolbar for hobby-related bookmarks and another folder for work-related bookmarks. To add a new bookmark to the Personal Toolbar:
Personal Toolbar Folder.
New Folder.
The new bookmark folder will appear at the end of the Personal Toolbar.
The buttons in your Personal Toolbar now correspond to the bookmarks in the folder you designated.
Tip: To quickly remove a bookmark placed on the Personal Toolbar (not in a folder), right-click on the bookmark and select Delete.
Note: Standard buttons on the Personal Toolbar such as Bookmarks, Search, Go, Print and Home cannot be rearranged, but they can be turned off and on.
Tip: To move a bookmark placed on the Personal Toolbar quickly, click and drag the bookmark to another location on the Personal Toolbar or to a folder.
[Return to beginning of section]
The Status Bar is located at the bottom of any &brandShortName; window. It includes the following:
 :
Appears when a website has used a cookie in a way that requires you to be
notified. For more information, see
Cookie
Notification.
:
Appears when a website has used a cookie in a way that requires you to be
notified. For more information, see
Cookie
Notification.[Return to beginning of section]
Use the Component Bar at the bottom left of any &brandShortName; window to switch between tasks (such as browsing or mail).

[Return to beginning of section]
There are two ways to hide the toolbars.
To minimize a toolbar:
To completely hide a toolbar, including its triangle:
To reverse this action, open the View menu, choose Show, and then select the toolbars you want to show.
[Return to beginning of section]
Bookmarks are shortcuts to your favorite and most-visited web pages. Rather than typing in long URLs (web addresses), you can create bookmarks that take you directly to the pages you want to see.
You access your bookmarks through the Bookmarks menu, the Bookmarks tab on Sidebar, and the Manage Bookmarks window. You can control what's listed in the Bookmarks menu by adding bookmarks for your favorite web pages and organizing your list of bookmarks any way you want.
&brandShortName; comes with some bookmarks already available. To use a bookmark:
[Return to beginning of section]
You can bookmark your favorite websites to make it easy to return to them.
To bookmark the current page, perform one of these steps:
Tip: If you have multiple Navigator tabs open in a
window, you can select Bookmark this groups of tabs
to add a
single bookmark that will open all of the open tabs in the current
window.
next to the Location Bar to a place on
the Personal Toolbar. You can drag a bookmark to the following places:
For more information about adding bookmarks to the Personal Toolbar, see Adding Personal Toolbar bookmarks.
|
| Personal Toolbar |
next to the Location Bar to a place on
the bookmark list in the Bookmarks tab.
Notes:
may appear as another page-specific
icon if you have checked Show Website Icons in preferences. See
Appearance Preferences -
Appearance for more information on changing this preferences.[Return to beginning of section]
To organize your bookmarks, open the Bookmarks menu and choose Manage Bookmarks. Perform any of the following tasks in your Manage Bookmarks window.
Tip: You can open the Manage Bookmarks window from the Bookmarks tab in Sidebar. Click on Manage at the top of the Bookmarks tab.
To view bookmarks inside of folders:
To move a bookmark or a folder to another location in the list:
To create a new folder or separator:
To remove a bookmark or a folder from the list:
To sort your bookmarks in the Manage Bookmarks window:
Tip: To add more columns, open the View menu, open
Show columns
, and select a column header in the list.
When you create a new bookmark, &brandShortName; normally adds it to the bottom of your bookmarks list. If you prefer to file your bookmarks in a folder, you can designate a new bookmarks folder.
[Return to beginning of section]
You can change the information for any individual bookmark.
You can rename the bookmark (the name appears in your bookmark list), add descriptive information, or set a keyword.
You can also set &brandShortName; to check bookmarked websites for changes.
[Return to beginning of section]
To search the bookmarks list:
Save query in bookmarksto save this search for later use.
Tip: If the list is hard to read, try expanding the search results window.
[Return to beginning of section]
Your bookmarks are stored in a file named bookmarks.html. You can export a copy of this file and save it in a folder of your choosing. You can then edit it and treat it as you would any HTML file.
Export Bookmarks Filedialog box, choose a folder. Your bookmarks.html file will be copied into the folder you designate.
Your &brandShortName; bookmarks are not altered by this procedure.
You can also import bookmarks files from other sources. For example, you can import bookmarks files from earlier &brandShortName; versions, other browsers, or from bookmarks files that your friends send you.
Before you start, make sure that the bookmarks file you want to import is an HTML file.
Import Bookmarks Filedialog box, locate and select the bookmarks file you want to import.
The imported bookmarks file is treated as a group of new bookmarks and added to the bottom of your bookmarks list. If you have designated a new bookmark folder, the imported bookmarks are added to that folder.
Note: Importing a bookmarks file imports the bookmarks and folders from that file. It does not create two bookmarks files.
[Return to beginning of section]
You can specify the page that loads when the browser starts:
Note: If you selected Home Page, type the URL in the Location Bar.
[Return to beginning of section]
Your home page is the page that opens when you click the Home button in the Personal Toolbar. Depending on how your preferences are set, it may also be the page that opens automatically when you launch &brandShortName;.
To specify your home page:
Tip: To specify your home page quickly, drag the bookmark
icon from the Location Bar to the Home Page
button on the Personal Toolbar.
[Return to beginning of section]
You can choose components (such as Mail & Newsgroups and Composer) to launch when you start &brandShortName;:
[Return to beginning of section]
Copyright © 2003-2010 The Mozilla Foundation.