
Welcome to &brandShortName;! One of the most popular ways people use &brandShortName; is to browse the Web. Navigator, the &brandShortName; component that lets you visit web pages, offers many ways to visit web pages and search the Web.
This section introduces you to Navigator, and how you can use it to browse, search, and save web pages.
When you start &brandShortName;, you see Navigator, your browser.
A What's New
page appears automatically in the browser
window when you first launch &brandShortName;.
After the first launch, you will normally see your home page when you launch &brandShortName;. Unless you choose a home page yourself, your home page is chosen by your network or Internet service provider, or you see &brandShortName;'s home page.
To choose your own home page, see Specifying How &brandShortName; Starts Up.
Tips:
[Return to beginning of section]
You move to a new page by typing its URL—its location (address) on the
Web. URLs normally begin with http://
, followed by one or more
names that identify the address. For instance,
http:/mozilla.org
.
Using the lock icon near the lower-right corner of the window, you can check a web page's security status at any time. For details, see Checking Security for a Web Page.
Tip: To quickly select the URL in the Location Bar, press CmdCtrl+L.
|
| Location Bar |
Don't know a URL? You can type part of a URL, such as
cnn
(for www.cnn.com); or you can type a general word, such as
gifts
or flowers
. Navigator guesses what page you
want to view, or displays a page with a choice of links related to the word
you typed.
If you are new to the Internet, see the Internet Guide.
[Return to beginning of section]
Most web pages contain links you can click to move to other pages.
[Return to beginning of section]
There are several ways to re-visit pages:
 |
|||
| Back | Forward | ||
|
| Location Bar |
Tip: The Sidebar History tab also allows you to choose from pages you've visited during the past several sessions. For information, see Adding Sidebar Tabs.
The history list contains links to recently visited pages. The Location Bar list contains links to pages you've typed into the Location Bar and then visited.
To access the history list from Navigator, open the Go menu and choose History. To access the Location Bar list, click the arrow at the right end of the Location Bar.
Tip: To quickly open the history list, press Cmd+ShiftCtrl+H.
If you don't want the Location Bar or history list to display the pages you've been visiting, you can clear the history list and Location Bar history entirely or selectively.
To delete all pages from the Location Bar or history list, begin from the Navigator window:
Tip: In Remember visited pages for the last [__]
days
, you can set the number of days pages will remain in the history
list.
To selectively delete pages from the history list, do any of the following:
Delete entire domain *.[domain name]. For example, use this command if you want to delete all pages that end in
mozilla.org.
Delete all from [subdomain]. For example, use this command if you want to delete all pages from
bugzilla.mozilla.orgbut not
mozilla.org.
Tip: To sort the history list, click one of the categories (Title, Location, or Last Visited). Click the title again to reverse the order.
[Return to beginning of section]
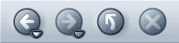
If a page is taking too long to appear, or you change your mind and don't want to view it, click the Stop button.
To refresh the current page, or get the most up-to-date version, click the Reload button, or press CmdCtrl+R.
|
||
| Reload | Stop | |
To refresh the current page and reset all changes made (if the page contains a form), hold down the Shift key and click the Reload button, or press CmdCtrl+Shift+R.
[Return to beginning of section]
The addresses, or URLs, of web pages can be quite long and difficult to remember. Fortunately, it's not necessary to memorize URLs in order to browse the Web. Your browser has a list of bookmarks, which are pointers to interesting web pages.
To go to a bookmarked page, begin from the Navigator window:
Tip: To retrace your steps, click the Back arrow.
You can save your own bookmarks to point to pages you frequently visit, or to other interesting places on the Web. See Creating New Bookmarks for more information.
[Return to beginning of section]
When you visit more then one web page at a time, you can use Tabbed Browsing to navigate the Web faster and easier.
Tabbed Browsing lets you open tabs, each displaying a web page, within a single Navigator window. You don't have to have several windows open to visit several different web pages. This frees up space on your desktop. You can open, close, and reload web pages conveniently in one place without having to switch to another window.
You can manage your navigation tabs easily and control when tabs are opened automatically. For more information about setting Tabbed Browsing preferences, see Navigator Preferences - Tabbed Browsing.
To learn more about using Tabbed Browsing, see Tabbed Browsing.
[Return to beginning of section]
In addition to navigating the Web with Navigator, you can let the Web come to you by using Sidebar.
Sidebar is a customizable frame in your browser where you can keep items that you need to use all the time—the latest news and weather, your address book, stock quotes, a calendar—and many other available options. Sidebar presents these items to you in tabs that it continually updates.
&brandShortName; comes with some Sidebar tabs already set up, but you can customize Sidebar by adding, removing, and rearranging tabs. For details, see Sidebar.
To view an item in Sidebar, click its tab.
 |
Sidebar Handle |
If it is not already open, open Sidebar by clicking its handle. If the handle is missing, open the View menu in Navigator, choose Show/Hide, and then Sidebar from the submenu. |
Tip: To quickly open or close the Sidebar, press F9.
[Return to beginning of section]
There are four ways to search quickly: from the Location Bar, from Sidebar, from the Net Search page, and by selecting words in a web page.
Searching for web pages on a particular topic is as easy as typing a question, or just a word or two, into the browser's Location Bar, as shown below.
![]()
For example, if you want to find information about baby dolls:
baby doll. Your typing replaces the current text.
Search Google forat the bottom of the drop-down list in the Location Bar. (Your default search engine may be different.)baby doll
The default search engine you choose in
Preferences
is used. Search results for baby doll
appear in both the
browser window and in Sidebar. Click the links to visit web pages
about baby dolls.
After you perform a search, the results are saved in Sidebar's Search tab until you do a new search. You don't have to click the Back button to retrieve the search results.
Note: You can also use Internet Keywords to search from the Location Bar.
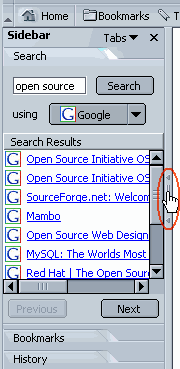
The Sidebar Search tab lets you quickly search and bookmark your search results. For example, if you want to find information about toy cars:
usingdrop-down list, and choose a search engine.
toy carin the search field.
Note: If the Sidebar Search tab contains a list of search engines from which to choose, then it is set to search in Advanced mode and you will have to choose one or more search engines before clicking Search. You can keep it that way or change to a basic setting in Preferences.
Tip: To display the next or previous page of search results quickly, click the Next and Previous buttons at the bottom of the Sidebar Search tab.
See Sidebar for more information on how to use Sidebar.
The Net Search page lets you type in a Search term or phrase, or explore several categories (such as Arts & Entertainment, Business, and many more) that may interest you. To visit the Net Search page, perform one of these steps:
&brandShortName; allows you to search for words you select within a web page:
Search Web for [your selected words]for the menu.
&brandShortName; opens a new window or tab (depending on your preferences) and uses your default search engine to search for your selected words. To learn how to change the search engine used to search for your selected words and the way your search results are displayed, see Navigator Preferences - Internet Search.
[Return to beginning of section]
You can set the Sidebar Search tab to Advanced mode, which lets you narrow a search or choose one or more search engines.
withindrop-down list, and choose a category.
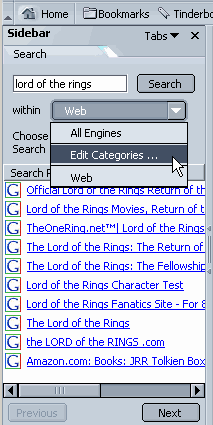
You can specify which search engines should be used for different categories of searches. For example, you can select one set of search engines to search for travel, and select another set of search engines to search for software.
withindrop-down list, click
Edit Categories. You see the Edit Categories dialog box.
[Return to beginning of section]
You can choose a different search engine as the default. You can also specify how you want search results displayed in Sidebar.
Open the Search tab in the Sidebar when search results are availableif you want the Sidebar search tab to open and show your search results.
[Return to beginning of section]
Internet Keywords work with the Location Bar to help you quickly find specific types of information. There are several ways to use Internet Keywords:
shopor
quote, followed by the word you want to look up, to get specific information. For instance,
shop petstakes you to a page with links to online pet stores.
moviesor
restaurants, for local information. For instance, type
san francisco restaurants.
Important: To use Internet Keywords, you must press ReturnEnter on your keyboard instead of clicking the Search button. Pressing ReturnEnter activates the Internet Keyword feature; clicking Search initiates a search.
To see the difference, try this:
apple imacinto the Location Bar and press ReturnEnter. Apple Computer's iMac Web page appears.
apple imacinto the Location Bar and click Search. You see a list of links related to Apple Computer's iMac models.
If typing Internet Keywords into the Location Bar is not working for you, check your Smart Browsing preferences to be sure the Internet Keywords feature is enabled.
To see a recent stock quote for a company, type quote
followed
by the company's stock ticker symbol, and press
ReturnEnter.
If you don't know a company's stock ticker symbol, type the company's name. The quote page will list all companies with similar names, and you can choose the one for which you want a quote.
[Return to beginning of section]
To find text within the page you are currently viewing in Navigator:
Find in This Page. If the page you are viewing contains frames, you may need to click within a frame before you begin your search. You see the
Find in this Pagedialog box.
To find the same word or phrase again:
[Return to beginning of section]
Other than searching text through the Find dialog, you can also search by typing directly into a Web page.
If you repeat the same character, it will start to cycle through all
the links that begin with that character. However, if it can find a
match with the exact string you've typed, such as
oo
in woods
, it will go there
first.
/helloto search any text containing the string
hello.
Type Ahead Find works with any window, such as this help file (try it!).
This feature also works with international characters such as Chinese and Japanese.
[Return to beginning of section]
To search the bookmarks list, begin from the Navigator window:
name,
location,
description, or
keywordto choose where you would like to search.
contains,
starts with, or
ends withif you know only part of the word or phrase for which you're searching.
isif you know exactly what you're searching for.
is notor
doesn't containto exclude pages.
Tip: To quickly open the Bookmark Manager, press CmdCtrl+B.
To search the History list:
titleor
locationto choose where you would like to search.
contains,
starts with, or
ends withif you know only part of the word or phrase for which you're searching.
isif you know exactly what you're searching for.
is notor
doesn't containto exclude pages.
To use the search results:
Tips:
[Return to beginning of section]
To copy some text from a page, begin from the Navigator window:
You can paste the text into other programs.
To copy a link (URL) or an image link from a page:
You can paste the link into other programs or into Navigator's Location Bar.
[Return to beginning of section]
To save an entire page, begin from the Navigator window:
When you view a page containing frames and a frame is currently selected, the Save Frame As option is offered in the drop-down list in addition to Save Page As. This lets you save only the page within the selected frame.
Saving a file onto your hard drive lets you view the page (or its HTML code) when you're not connected to the Internet.
To save an image from a page:
To save a page without displaying it (which is useful for retrieving a non-formatted page, like a data file, that's not intended for viewing):
Important: Some links automatically download and save files
to your hard drive after you click them. The URLs for these links often begin
with ftp
or end with a file-type extension such as au
or mpeg
. These links might transmit software, sound, or movie
files, and can launch helper applications that support the files.
Tip: To set an image as your desktop wallpaper on Windows, right-click on an image and choose Set As Wallpaper from the pop-up menu.
[Return to beginning of section]
To print the current page, begin from the Navigator window:
To print selected text, begin from the Navigator window:
The size of the printed page, not the size of the onscreen window, determines placement of content on the printed page. Text is wrapped and graphics are repositioned to accommodate paper size.
To have an early look at how a page will look before it is printed, you can use Print Preview. Begin from the Navigator window:
In Print Preview, you have the following options:
 ,
Previous
,
Previous  , Next
 ,
or Last
,
or Last
 button
to move between pages.
button
to move between pages.50and press Enter to make each page half the size of the original page.
Note: Some Page Setup functions are different or unavailable on Mac OS, Linux or Unix.
To customize how pages are printed in &brandShortName;, you can use Page Setup. From Navigator, open the File menu and choose Page Setup.
In Page Setup, you can change the following settings for pages you want to print:
http://).
3 of 5would be shown on the third page.
3 of 5)
Tip: To see a preview of changes made to Page Setup, use Print Preview.
[Return to beginning of section]
If you browse, compose, or send and receive email in more than one language, you need to select the appropriate character encodings and fonts.
A character encoding method is the way a document or message has been converted to data to be used by your computer. All web documents and mail and news messages use a character encoding method (also known as a character set, character coding, or charset).
The character encoding method for a document may depend on its language. Some languages e.g. most West European languages, share the same encoding method. Others such as Chinese, Japanese, and Russian use different methods. In contrast, Unicode provides language-independent encoding methods. UTF-8, for examples, can be used for any language document.
Your version of &brandShortName; is set to a default character encoding appropriate for your region. However, if you use more than one language, you may need to select appropriate character encoding methods and designate the fonts you wish to use for your language/script.
To select character encodings, begin from the Navigator window:
The character encoding methods you select are added to the Character Encoding menu. If you have more than one encoding method selected, the active one has a bullet (dot) next to it.
&brandShortName; can detect which character encoding a document uses, and can display it correctly on your screen. To take advantage of this capability, begin from the Navigator window:
To make changes to your list of active character encodings:
To change the default fonts within a language group:
Fonts fordrop-down list, choose a language group/script. For instance, to set default fonts for West European languages/script, choose
Western.
Many web page authors choose their own fonts and font sizes. You can use the
author's font settings by selecting Allow documents to use other
fonts
.
[Return to beginning of section]
The language you use for &brandShortName; affects the text of buttons, dialog boxes, menus, tools, and other items. The functionality of these items remains the same.
To set your preferred language:
Installed language packsselect a language pack.
Note: You must restart &brandShortName; after you change your preferred language.
The content pack you use affects the home page, bookmarks, toolbar contents, Sidebar, and other items.
To use a content pack:
Installed content packsselect a content pack.
Note: You will need to restart &brandShortName; after you change to another content pack.
Tip: To download more language packs or content packs, click Download More.
Web pages are sometimes available in several languages. &brandShortName; presents pages in the language you prefer, if it is available. You can specify the languages you wish to see, in order of preference.
To set language preferences:
Note: Two-letter codes enclosed in brackets appear next to each language in the list. These are standard abbreviations for languages. For a complete list, see the online document, Codes for the Representation of Names of Languages.
[Return to beginning of section]
If you're looking for a version of &brandShortName; in a language other than American English, you can download it from the SeaMonkey Project Releases page.
[Return to beginning of section]
Navigator can handle many types of files. However, for some files, such as
movies or music, Navigator needs plug-ins or helper
applications
that can handle those files. If &brandShortName; doesn't have the needed
helper application or plug-in, it can still save the file to your hard disk.
When saving files, you can keep track of them using Download Manager.
Plug-ins are helper applications that extend the functionality within Navigator and run within &brandShortName;. Plug-ins like Sun Java, Macromedia Flash, and RealNetworks RealPlayer allow &brandShortName; to show multimedia files and run small applications, such as movies, animations, and games.
&brandShortName; comes with no additional plug-ins installed, so you have to add them separately.
To see a full list of &brandShortName; plug-ins you can install, see the PluginDoc page on MozDev.org.
To see what plug-ins you currently have installed, do any of the following:
[Return to beginning of section]
When files can not be used within &brandShortName;, you have to option to launch helper applications that open outside of &brandShortName;. For example, to play MP3 files, programs like Winamp can be opened outside of &brandShortName;.
The settings in the Helper Applications preferences panel tell Navigator which helper applications to use on your computer. Usually, these preferences don't need to be changed since they are preconfigured. Also, if Navigator doesn't know which helper application to use, it allows you to find helper applications within the download dialog box.
The download dialog box has these options:
Note: You will only see this option if there is a program associated with the filetype in your system settings.
Tip: You can clear your saved options for Always ask
before opening this type of file
in preferences. For more information,
see Navigator
Preferences - Helper Applications.
For experienced users to fine-tune the Helper Applications preferences:
To add a new helper application to the list:
moviesor
sound files.
image/tiff.
Note: When you download a file, &brandShortName; will show you the MIME type on the download dialog box.
To specify how Navigator should handle different file types:
To remove an item from the list:
To learn more about Helper Application preferences, see Navigator Preferences - Helper Applications.
[Return to beginning of section]
You can use Download Manager to keep track of files you download. Download Manager shows the following information:
To open Download Manager, do the following:
The following menu options are available in Download Manager:
[Return to beginning of section]
When you bring a web page to your screen, &brandShortName; automatically loads (starts up) several features that help interpret web pages. These features, Java and JavaScript, can make web pages more lively, but they take time to load.
To learn how to turn off Java, see Advanced Preferences - Advanced.
To learn how to turn off JavaScript, see Advanced Preferences - Scripts & Plug-ins.
[Return to beginning of section]
Bookmark keywords allow you to create shorthand aliases for bookmarks and
Web searches. For example, if you give the bookmark to http://www.mozilla.org
the keyword m.o
, you can enter m.o in the Location Bar and
Navigator will load http://www.mozilla.org.
To set a keyword, you must first create a bookmark for the URL. Then,
Now, you can enter the keyword in the Location Bar, and &brandShortName; will load that URL.
Custom keywords can be used to create shortcuts for your favorite search engines, too. For example, you can create a keyword so that entering g Lord of the Rings will perform a Google I-Feel-Lucky search on Lord of the Rings.
To create a custom keyword for use with a Web search:
Now you can search without going to the search page first by entering keyword search_words in the Location Bar.
For more details and examples, see How Cool are Custom Keywords?
[Return to beginning of section]
Your computer stores copies of frequently accessed pages in the cache. This way, the computer doesn't have to retrieve the page from the network each time you view it.
To set the size of the cache or to clear it:
Important: A larger disk cache allows more pages to be quickly retrieved, but more of your hard disk space is used.
When you quit &brandShortName;, it performs cache maintenance. If maintenance takes longer than you wish, try reducing the size of the disk cache.
To specify how often Navigator checks the network for page revisions (so
that you don't keep stale
pages in the cache too long):
If pages that should be in the cache are taking longer to appear than they
should, make sure the preference is not set to Every time I view the
page
, because the verification requires a network connection that takes
time.
To refresh a page at any time:
[Return to beginning of section]
&brandShortName; can notify you when updates for your software are available, and it can install the updates automatically. &brandShortName; can also inform you when a new version of &brandShortName; is available.
To learn about setting up automatic software installation, see Advanced Preferences - Software Installation.
[Return to beginning of section]
If your mouse has a mouse wheel, you can control how the mouse wheel functions in &brandShortName;.
To learn more about setting up a mouse wheel, see Advanced Preferences - Mouse Wheel.
[Return to beginning of section]
&brandShortName; is best known for displaying web pages, both on the Internet and on your computer. To easily open web pages, you can make &brandShortName; your default browser.
Making &brandShortName; your default browser allows it to automatically open common file formats and protocols used on the Internet. Common Internet file formats and protocols include the following:
After installation is finished, &brandShortName; checks to see if it is
the default browser for any of the common Internet file formats or
protocols. If it isn't, you are asked, &brandShortName; is not
currently set as your default browser. Would you like to make it your
default browser?
Click Yes to make &brandShortName; the default browser. If you click No,
you will be prompted with this question each time &brandShortName;
starts, unless you deselect the checkbox Check at startup next time,
too
.
If you deselect the checkbox, Check at startup next time, too
,
you can still make &brandShortName; the default browser by changing your
settings in Preferences. To learn how to set &brandShortName; as the
default browser through &brandShortName; preferences, see
Navigator Preferences -
Navigator.
You can manually customize how &brandShortName; handles various file formats and protocols. For more information, see Advanced Preferences - System.
[Return to beginning of section]
Quick Launch shortens the time it takes for &brandShortName; to start. When &brandShortName; uses Quick Launch, the &brandShortName; logo icon is present in the system tray (near the clock).
| &brandShortName; Quick Launch Icon |
Tip: To quickly start components (such as Composer, Mail & Newsgroups, and the Address Book window), right-click the &brandShortName; logo icon and select the component in the pop-up menu.
When you installed &brandShortName;, you were given the option of enabling or disabling Quick Launch. If enabled, Quick Launch loads part of &brandShortName; into memory when Windows first starts (and each time &brandShortName; first starts up). Quick Launch allows &brandShortName; to stay in memory after you close all &brandShortName; windows. This lets &brandShortName; quickly start up when you need it, without having to load all of &brandShortName;. If your computer is low in memory, you can disable Quick Launch to conserve memory.
To enable or disable Quick Launch in &brandShortName;:
Keep &brandShortName; in memory to improve startup performanceto enable Quick Launch, or deselect it to disable Quick Launch.
Tip: To easily disable Quick Launch, right-click on
the &brandShortName; logo in the system tray (near the time) and
select Disable Quick Launch
in the pop-up menu.
This section explains how to work with proxies.
Many organizations block access from the Internet to their networks. This prevents outside parties from gaining access to sensitive information. The protection is called a firewall.
If your organization has a firewall, the browser may need to go through a proxy server before connecting you to the Internet. The proxy server prevents outsiders from breaking into your organization's private network.
Before you start:
To set the browser to work with the proxy:
Advancedto set Advanced Proxy Preferences
Domain names are the part of a URL that contains the name of an organization, business, or school—such as mozilla.org or washington.org. If you use local host names without the domain name, list them the same way. Use commas to separate multiple host names. The wildcard character [*] cannot be used.
For more information on using the Proxy preferences panel, see Advanced Preferences - Proxies.
[Return to beginning of section]
Copyright © 2003-2010 The Mozilla Foundation.